After some comparisons between manufacturers, as well as, bumpers within each manufacturer, I settled upon and ordered the ARB Deluxe Bar Winch Bumper from Just Differentials.
Two things stood out as the proverbial pain in the side on this install:
- ARB's mounting instructions were from 2008 (as dated on the instructions themselves). The instructions try and cover multiple different possible installation routes in the same document (including multiple winch types) and the pictures included in the instructions are inconsistent (pictures in the same installation sequence show different pieces of hardware) making it hard to figure out if you're looking at the same effort/work sequence; and
- old frozen chassis bolts connecting to welded nut plates inside the chassis itself
Neither were a deal breaker. Both were a pain in the side. More accurately, the old, rusted, chassis bolt journey became a pain in my back for a couple of days. I hereby declare I dislike, with extreme emotion, welded nut plates.
The shipment came in unscathed on a palette. It was interesting to see the ARB front-bumper packing philosophy as compared to the Slee Off-Road rear-bumper. ARB wrapped it in a spongy material and plastic wrap in thick cardboard; Slee, spray foam and thick cardboard. Both were quite different. Both worked even with the bumpers being multiple hundreds of pounds. No box damage. No bumper damage.
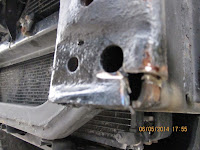
First, we were to grind/hacksaw off the lower wings of the chassis face plates. Choosing an angle grinder, done in no time.
Second, we were to remove the tie-downs and tow hooks on both the left and right sides of the chassis. Should have been easy.
- Step 1: Remove driver's perspective 15 year-old RH bolts without CenPeCo Penetrator because I'm an idiot
- Step 2: Break off the nut and nut plate inside the chassis, thereby precluding rear (of two) bolt removal
- Step 3: Cuss
- Step 4: Remove front bolt successfully
- Step 5: Spray CenPeCo Penetrator all the freak over the nuts and bolts on the driver's left side chassis
- Step 6: Successfully remove both bolts without issue and without bothering the nut plate
- Step 7: Cuss because of the broken nut plate and my stupidity
- Step 8: Sit, ponder, discuss, cuss, ponder and consider how to fix the brand new, we just started and ended this project in twenty minutes, problem
Basically, the reason you work with people who have more experience and IQ than yourself is to learn and benefit from their experience. Because the guy I'm working with is particularly mule-headed when it comes to fixing unfixable problems, saving you the commentary of elapsed time, multiple failed solution attempts and more cussing, he removed the bolt holding the body to the chassis (spaced with a ratchet head) and somehow got his fingers and such into a hole that didn't seem possible on the side of the chassis. New bolt and nut installed thereafter. Problem one solved.
According to the instructions, the bumper mounts just slide right onto the chassis and bolt right like magic. The right side of the truck (when sitting in the driver seat) slid on with some wiggling, grunting and verbal persuasion. The driver's LH side didn't fit at all. After some assessment, it seemed the LH faceplate was fatter than the bumper mount could take and it looked fattest on the bottom. So with a grinder I notched out a fat part to prove the theory. Progress, but not enough. After considering additional possibilities, we brought out the persuasion stick, aka a sledgehammer. Lo and behold, the front plate reformed itself and the bumper mount slid on without issue. Negotiation wins again. We installed the newly painted tie-downs and tow hook, tightened up and moved on. Problem two solved.
In retrospect, even though the vehicle was primarily a single owner for all of its life and a second owner (whom I know) for less than a year, we suspect the truck was at some point in a front-end bumper flattening the plates OR the plates themselves weren't formed and fitted correctly at the factory. Either way, it wouldn't fit as illustrated in the directions and required a sledge to remold the plates before the bumper mounts slid on like butter.
Mounting the bumper to the chassis mounts was the easiest part of the effort. An important pro-tip, dry fit the bumper. Put spacers between the bumper wings and quarter panels, set the bolts and tighten. This will ensure equal spacing all along the front, as well as, between both wings and quarters. Tightened. Gapped as desired. Done.
Summary: If you have an older vehicle, spray CenPeCo Penetrator on everything first. Dry mount everything using spacers where necessary. Tighten only after the dry-mount and start the party.


